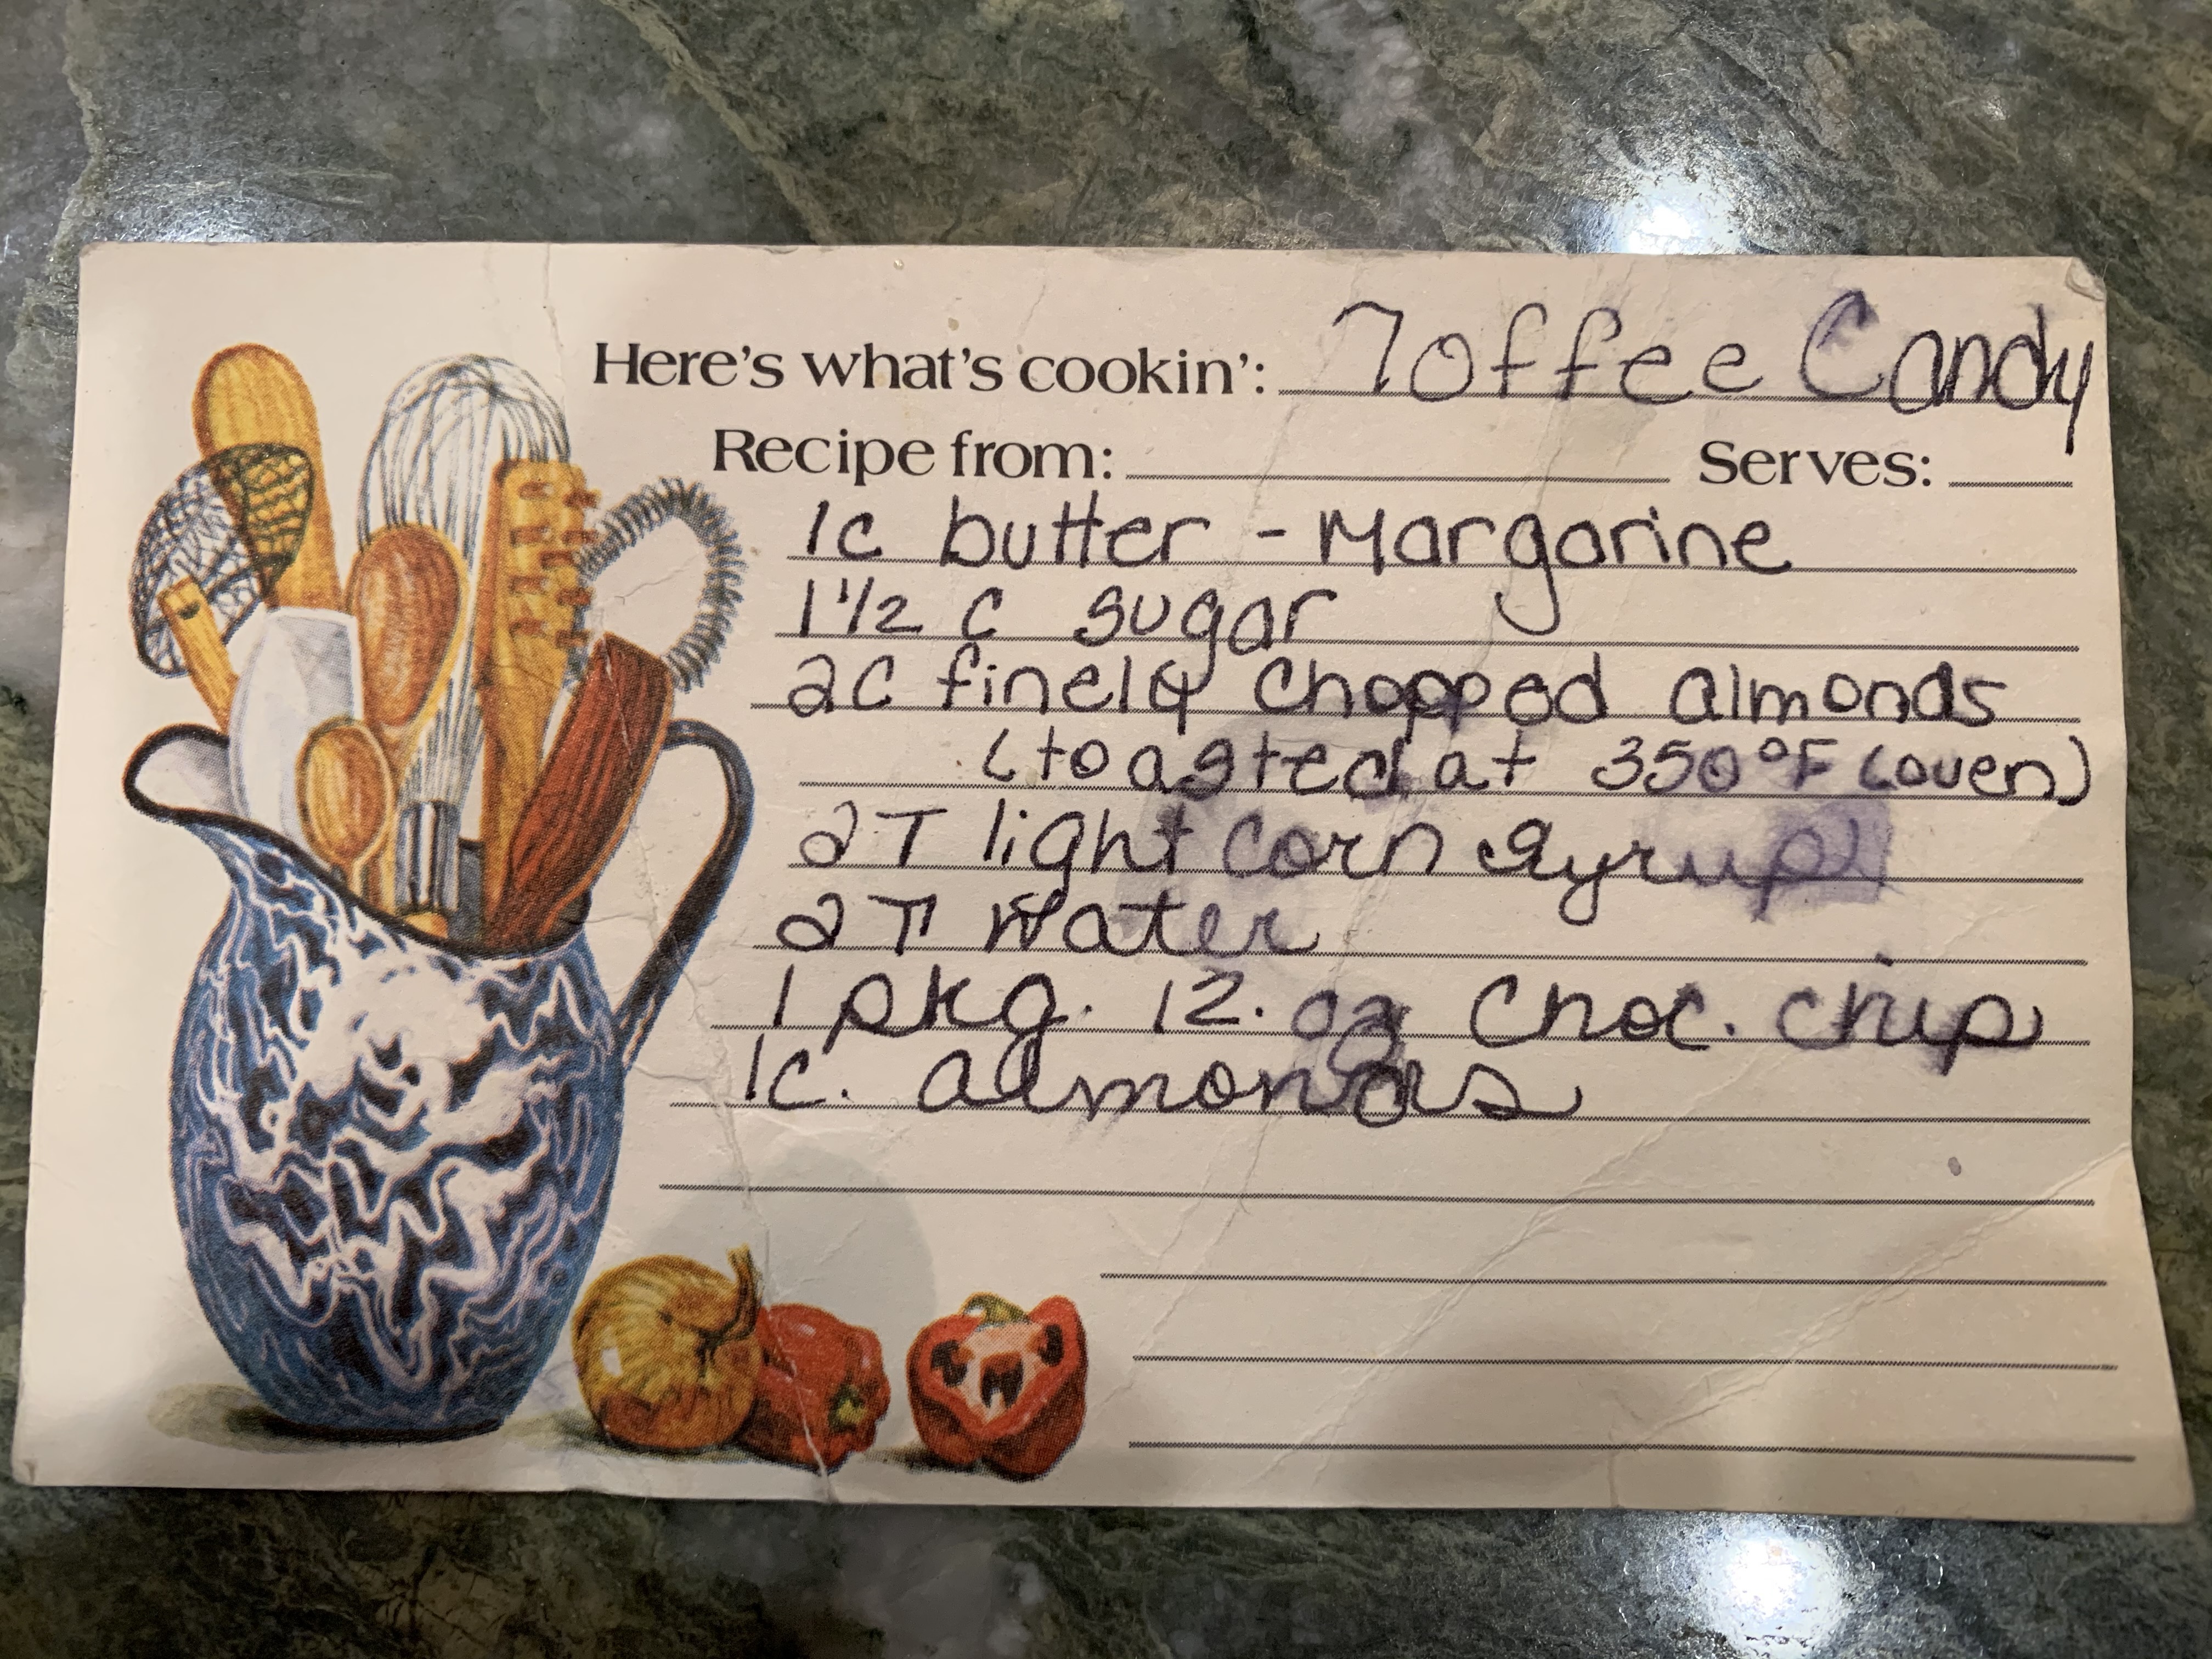
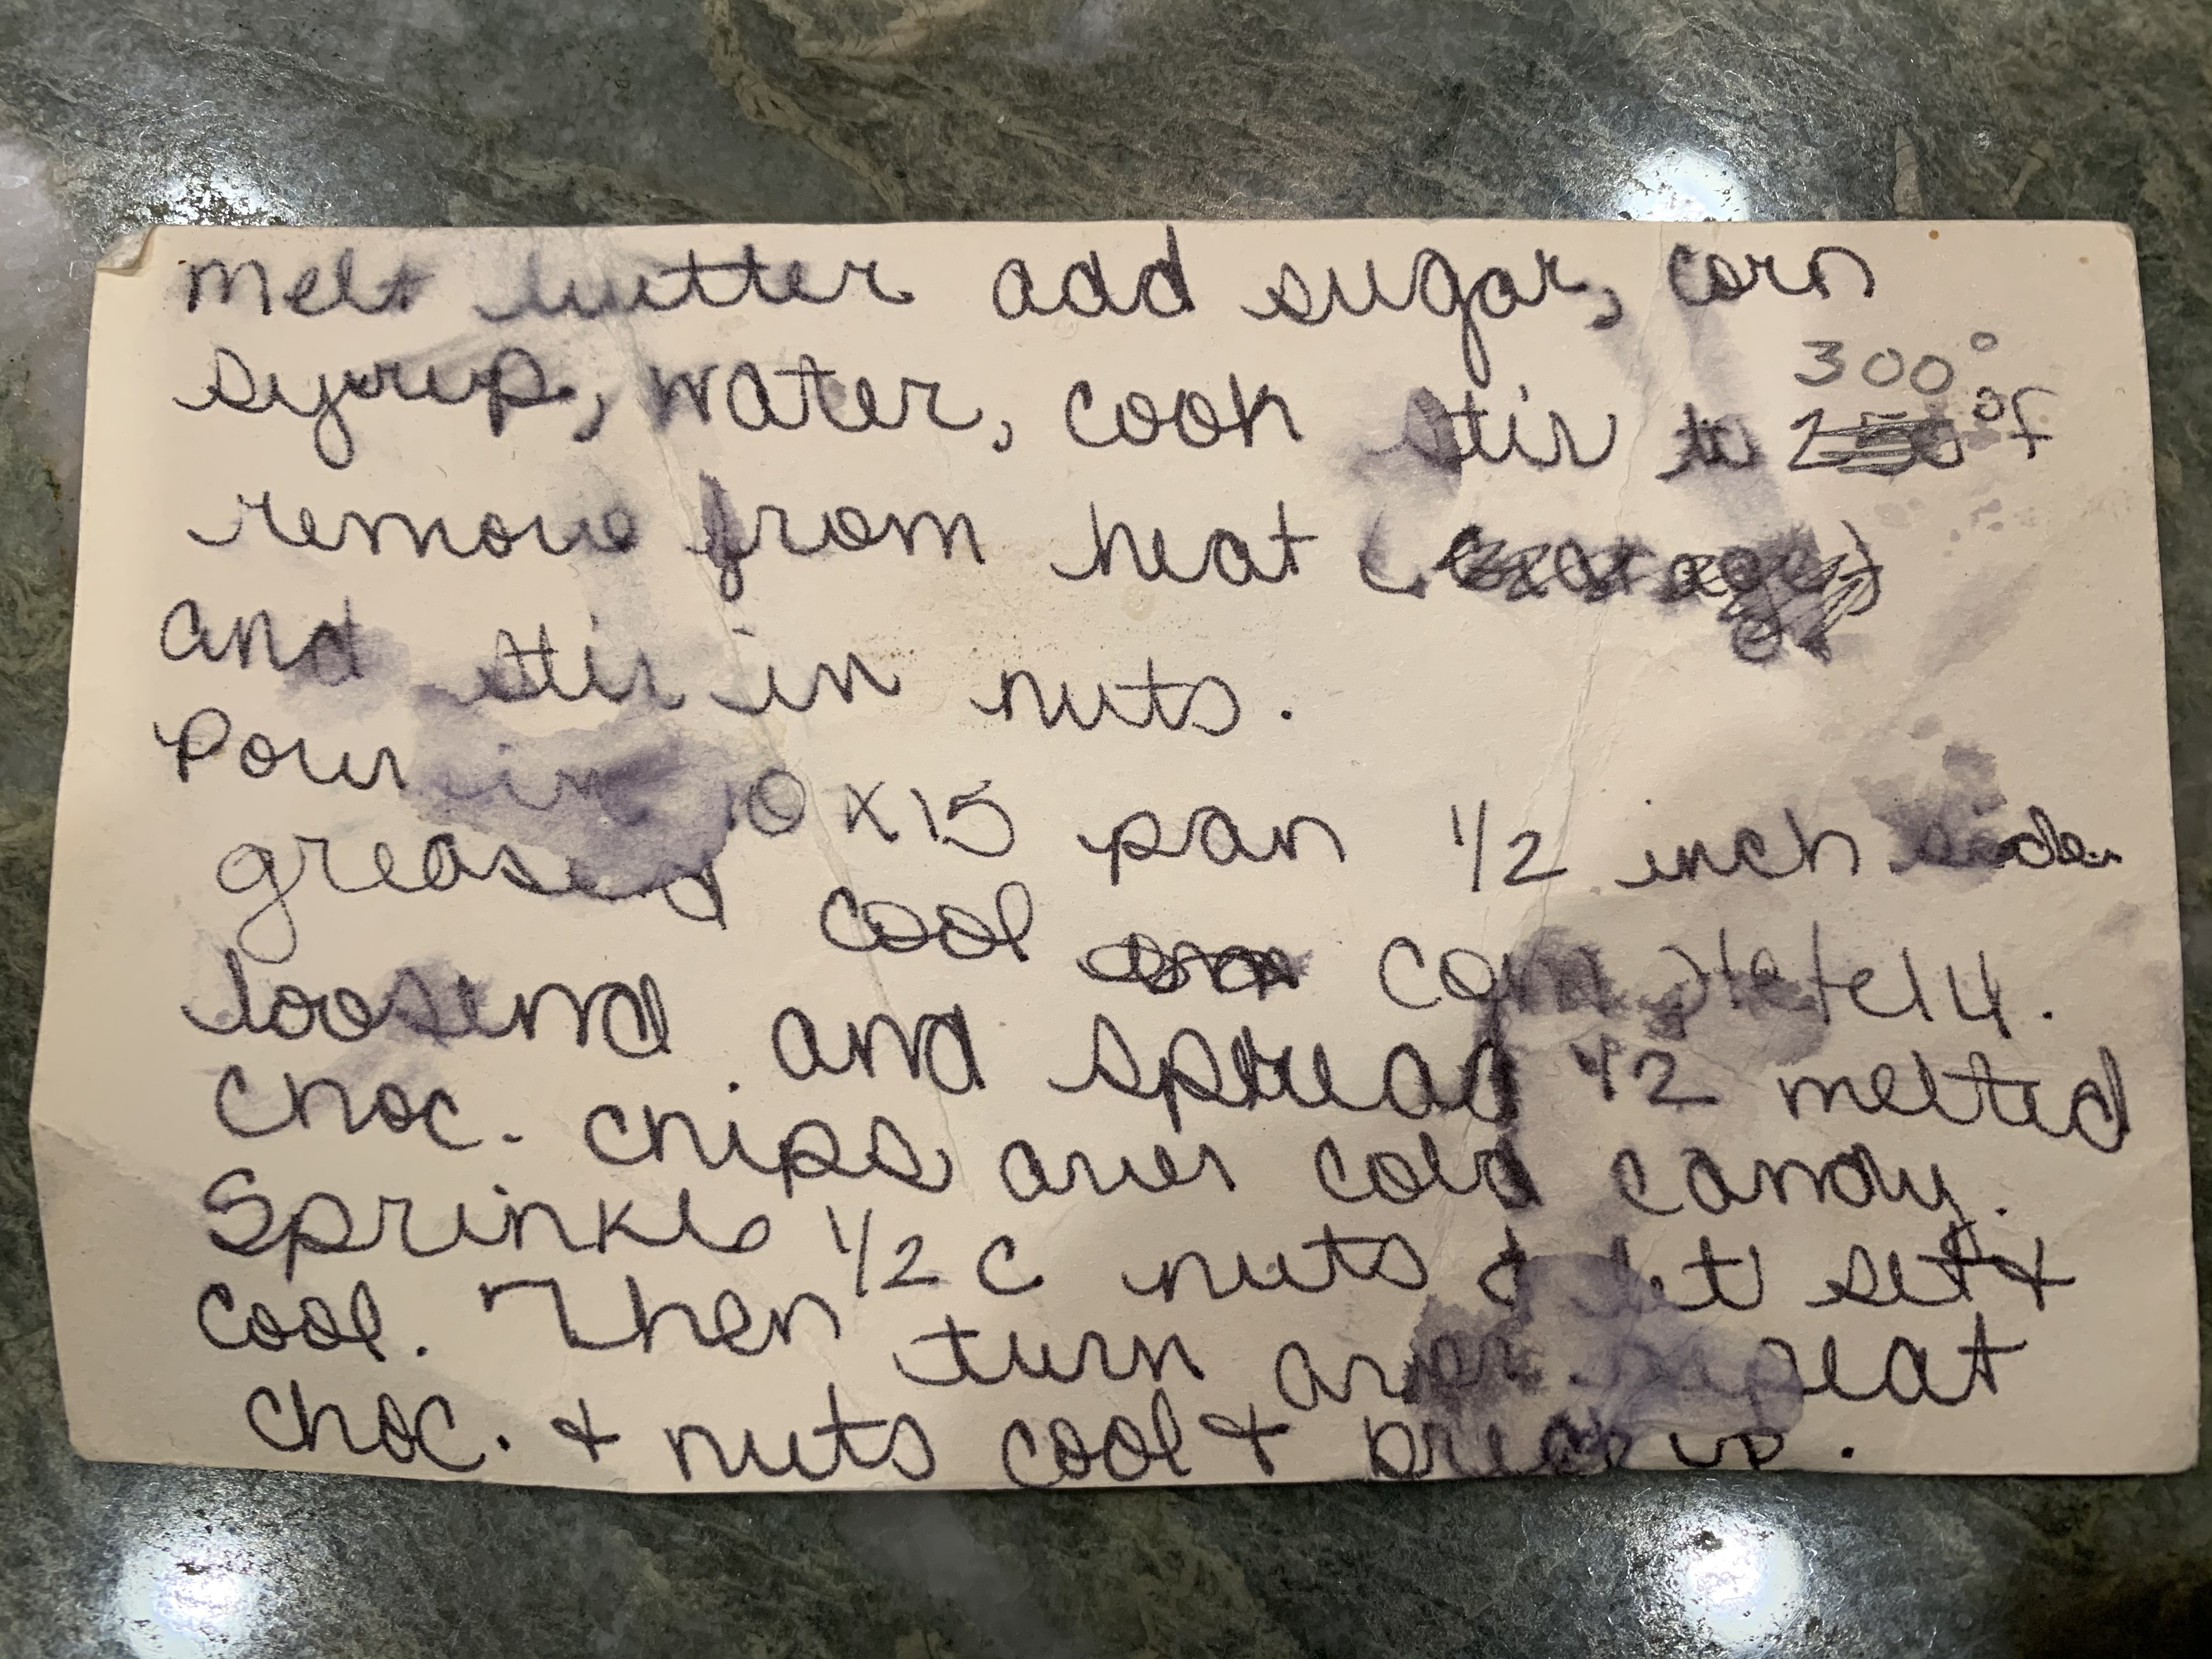
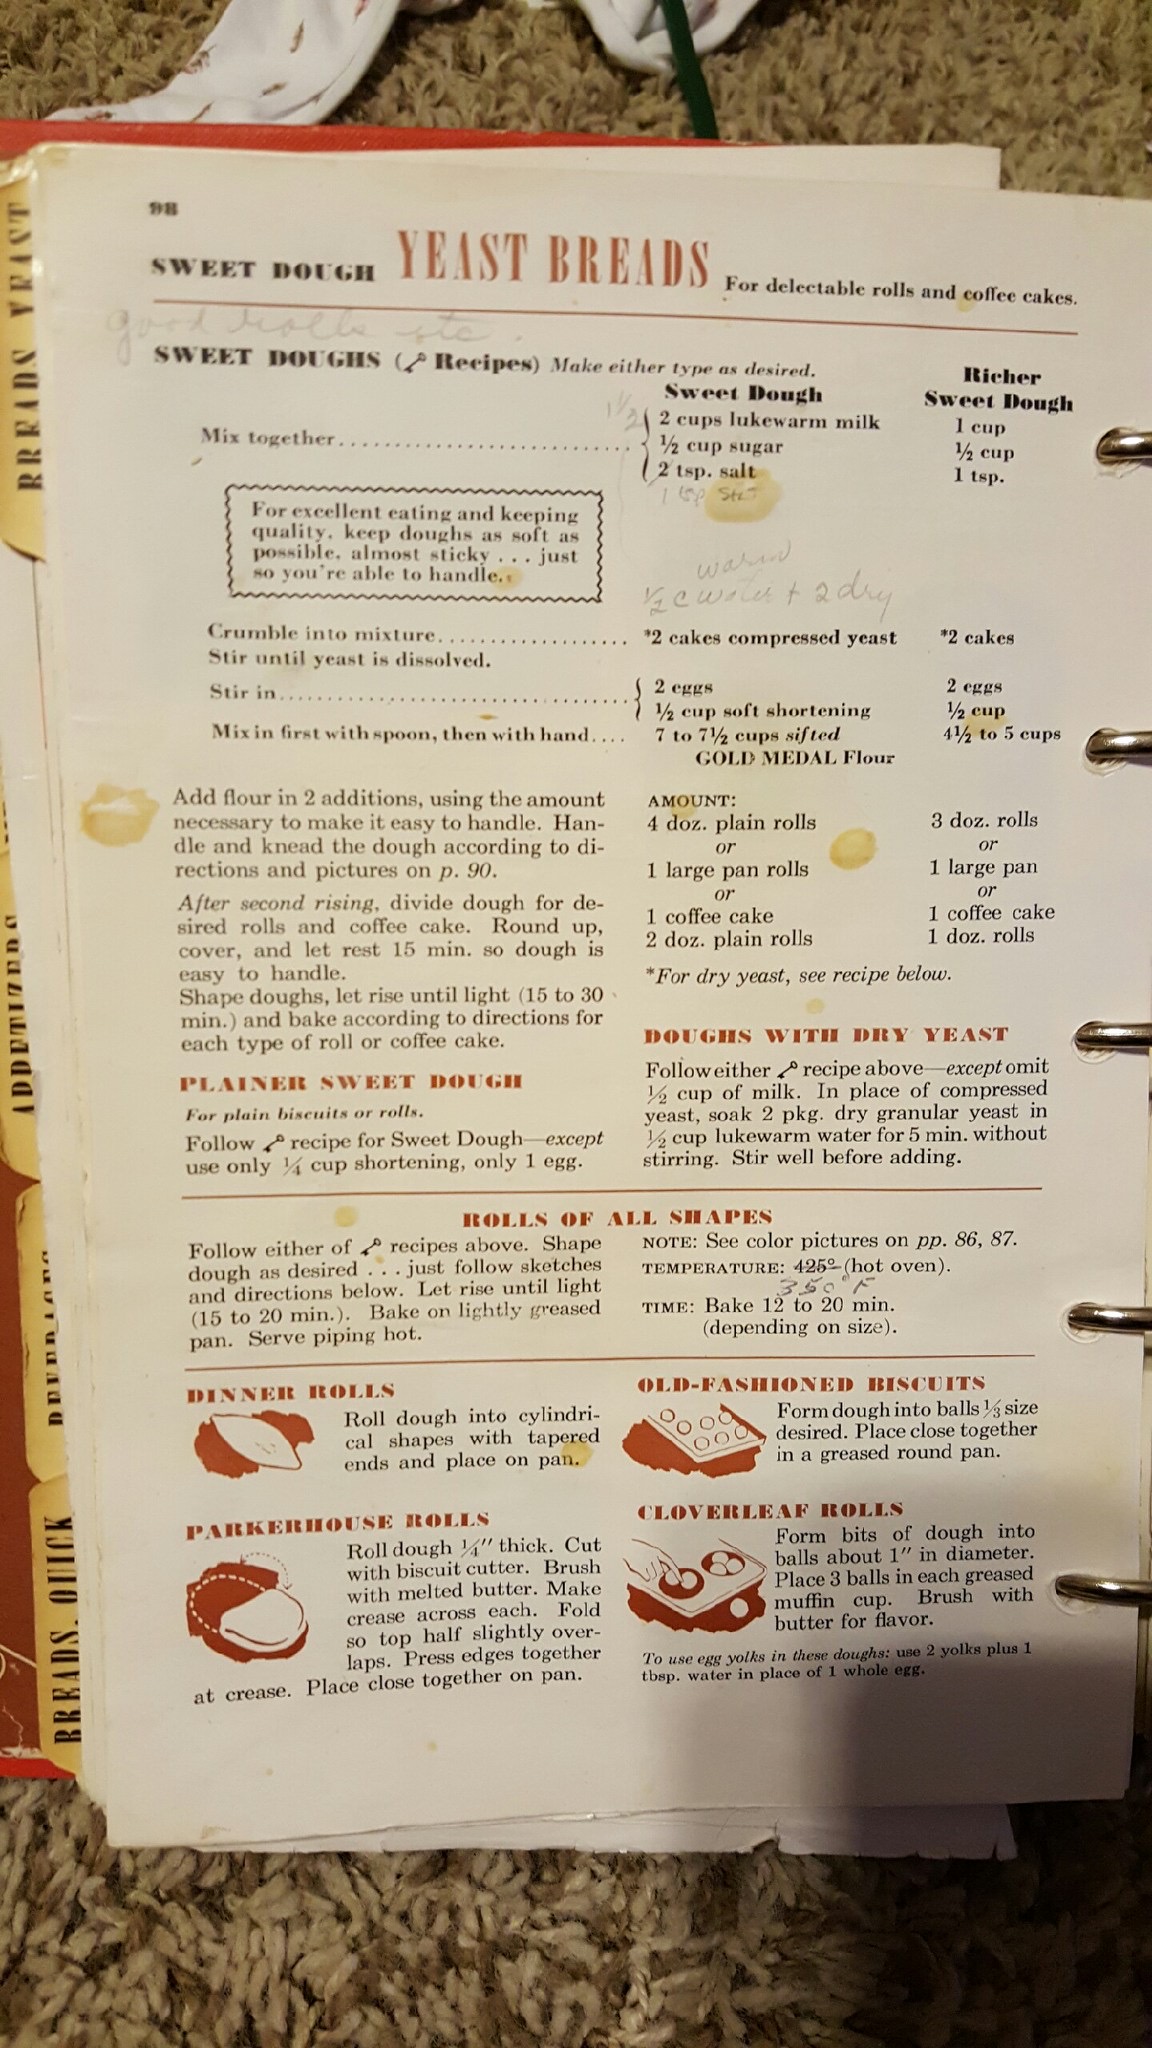
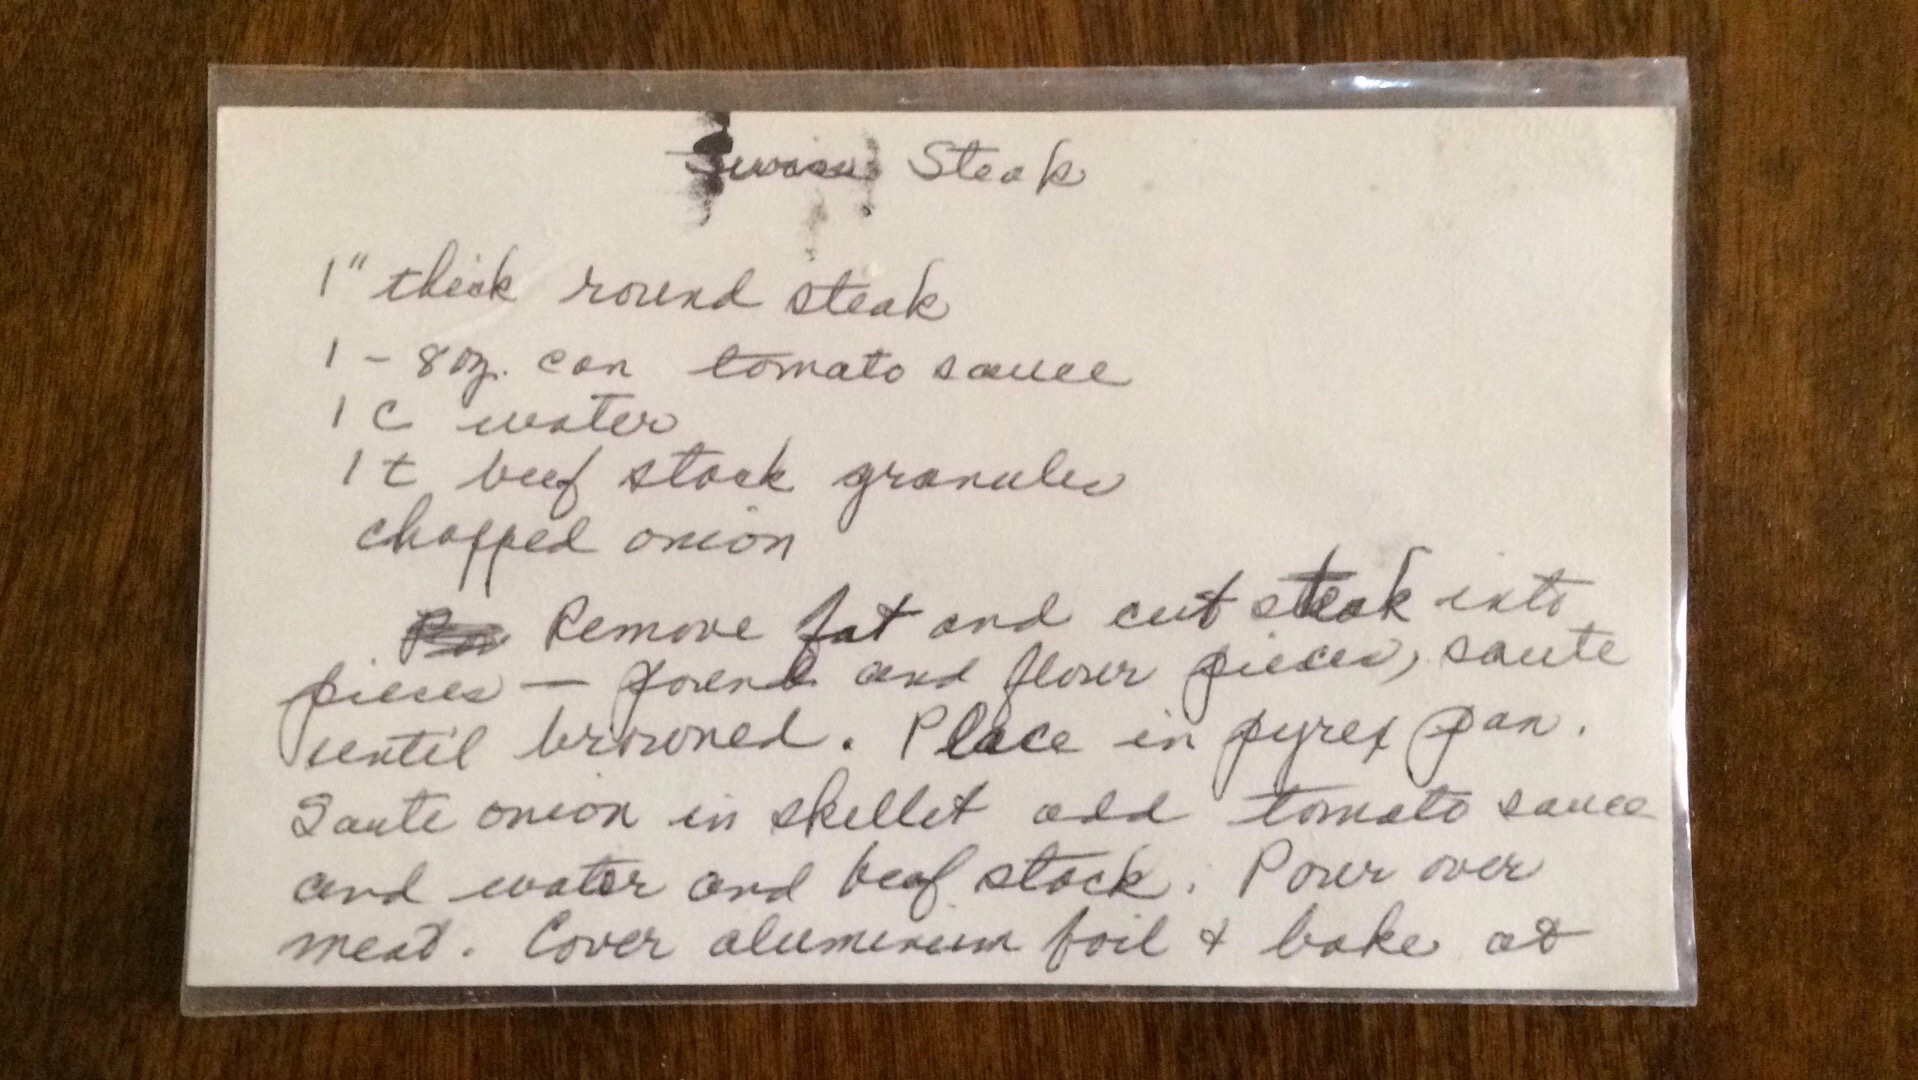
Simple Strawberry Shortcakes – tangy and fantastic.

From Bon Appetit

Ingredients


6 servings
2 cups all-purpose flour, plus more for surface
1½ tsp. baking powder
¼ tsp. baking soda
½ cup plus 1 tsp. sugar, divided
1½ tsp. kosher salt, plus more
1 lemon
½ cup (1 stick) cold unsalted butter
1 cup sour cream, divided
2 cups heavy cream, divided
1½ lb. strawberries
1 tsp. vanilla extract

Preparation

  1. Step 1

    Place a rack in center of oven; preheat to 400°. Line a rimmed baking sheet with parchment paper. Whisk 2 cups flour, 1½ tsp. baking powder, ¼ tsp. baking soda, 4 tsp. sugar, and 1½ tsp. salt in a large bowl to combine.

  2. Step 2

    Finely grate zest of about half of 1 lemon right into bowl (reserve lemon for later).

  3. Step 3

    Cut 1 stick cold butter into ½” pieces and toss with dry ingredients until coated. Work butter into dry ingredients by pinching and rubbing it between your palms until there are lots of flat shards and pea-sized bits remaining. Those small, uneven pieces of unincorporated butter create steam pockets as the shortcakes bake, resulting in a tender, flaky end result.

  4. Step 4

    Combine 1/2 cup sour cream and 1/2 cup heavy cream (plus 1/8 cup milk) in a medium bowl. Create a well in the center of the dry ingredients. Scrape cream mixture into well. Working in circles from inside the well outwards with a rubber spatula, mix dough until large, shaggy clumps form.

  5. Step 5

    Knead once or twice (don’t overdo it!) until it forms a mass and most of the flour has been incorporated into the dough.

  6. Step 6

    Transfer to a lightly floured surface. Pat to a 1″-thick square (it should be about 6×6″).

  7. Step 7

    Cut dough into 4 equal squares, then stack them all on top of each other, creating one very tall tower of dough. Press down on stack with your hands, flattening dough back to a square. This stacking method is what will create lots of flaky layers. Pat to a 7½x5″ rectangle about 1″ thick.

  8. Step 8

    Cut rectangle in half lengthwise, then cut each of those 2 rectangles into 3 squares. Transfer squares to prepared baking sheet. Sprinkle tops with 1 Tbsp. sugar. Freeze 10 minutes. (This will help ensure that the shortcakes rise—rather than spread out—in the oven.). ( I did not find this necessary, but I worked quickly so that the butter did not get too soft, but think the freezer step a good idea. )

  9. Step 9

    Bake shortcakes until golden brown all over, 20–25 minutes.

  10. Step 10

    While shortcakes bake, make your strawberries and whipped cream. If whipping cream by hand, place a large bowl in freezer to chill. Trim and discard stems of 1½ lb. strawberries. Cut smaller ones in half and larger ones into quarters. Transfer to a medium bowl. Cut reserved lemon in half and squeeze 2 Tbsp. lemon juice into bowl with strawberries. Add 3 Tbsp. sugarand toss to combine. Let sit at room temperature, tossing occasionally as you wait for the shortcakes. They will naturally create their own syrup through the mingling of the fruit juices with the sugar and lemon juice. ( I added more sugar and the lemon juice really makes a tangy taste difference )

  11. Step 11

    Pour remaining 1⅔ cups heavy cream into chilled bowl. Add 1 tsp. vanilla, 3 Tbsp. sugar, and a pinch of salt. Vigorously whisk with your largest whisk, making figure-8 motions, until soft peaks form. This will take 3–5 minutes of good ol’ elbow grease—but don’t be discouraged if it takes longer! If you’re not feeling up to the challenge, use an electric mixer and beat starting at low speed, gradually increasing to high as cream begins to thicken. You’re still looking for those nice, slightly floppy, soft peaks. Whisk in remaining ¼ cup sour cream until just incorporated.  ( I have done bad things like getting real whipped cream in a can before… )

  12. Step 12

    Let shortcakes cool at least 15 minutes. Gently split shortcakes in half with your hands. Place bottom halves in serving bowls. Divide whipped cream, then macerated strawberries among bottom halves. Drizzle any syrupy juices left in bowl over. Close with top halves of shortcake.

  13. Step 13

    Marvel at your creation. Serve and enjoy!  These were the best shortcakes, best strawberry shortcake I have ever had.  These were fantastic!

Herb Chicken with Lemon Cream Sauce – Damn Delicious

Herb Chicken with Lemon Cream Sauce

HERB CHICKEN WITH LEMON CREAM SAUCE

yield: 8 SERVINGS prep: 10 MINUTEScook: 40 MINUTEStotal: 50 MINUTES

INGREDIENTS

  • 1 tablespoon olive oil
  • 1 tablespoon Dijon mustard
  • Zest of 1 lemon
  • ½ teaspoon dried thyme
  • ½ teaspoon dried rosemary
  • Kosher salt and freshly ground black pepper, to taste
  • 8 bone-in skin-on chicken thighs
  • 2 tablespoons unsalted butter

FOR THE LEMON CREAM SAUCE

  • 2 cloves garlic, minced
  • ¼ teaspoon red pepper flakes, or more, to taste
  • ½ cup chicken broth
  • ½ cup heavy cream
  • Juice of 1 lemon
  • ½ teaspoon dried basil
  • Kosher salt and freshly ground black pepper, to taste

INSTRUCTIONS

  • Preheat oven to 400 degrees F.
  • In a small bowl, combine olive oil, mustard, lemon zest, thyme and rosemary; season with salt and pepper, to taste. Using your fingers or a brush, work the mixture onto both sides of the chicken.
  • Melt butter in a large oven-proof skillet over medium high heat. Add chicken, skin-side down, and sear both sides until golden brown, about 2-3 minutes per side; drain excess fat, reserving 1 tablespoon, and set aside.
  • Add garlic and red pepper flakes to the skillet, and cook, stirring frequently, until fragrant, about 1-2 minutes. Stir in chicken broth, heavy cream, lemon juice and basil; season with salt and pepper, to taste
  • Bring to a boil; reduce heat and simmer until slightly thickened, about 3-5 minutes. Return chicken to the skillet.
  • Place into oven and roast until completely cooked through, reaching an internal temperature of 165 degrees F, about 25-30 minutes.
  • Serve immediately.

Goulash – Easy American Goulash Recipe

Easy American Goulash Recipe

Old Fashioned Goulash – The same American goulash recipe that you grew up with. A hearty recipe that the entire family can enjoy any night of the week.

PREP TIME 15 minutes 
COOK TIME 30 minutes. 
TOTAL TIME 45 minutes

Ingredients

  • 1 pound elbow macaroni
  • 2 pounds ground beef
  • 1 onion, finely chopped
  • 3 cloves garlic, minced
  • 1 Tablespoon Worcestershire sauce
  • 2 (15 oz) cans tomato sauce
  • 2 (14.5 oz) cans petit diced tomatoes
  • 1 1/2 Tablespoon Italian seasoning
  • 2 teaspoon salt
  • 1/2 teaspoon black pepper
  • 1 cup cheddar cheese, shredded

Instructions

  1. Preheat oven to 350 degrees.
  2. Bring a large pot of water to boil. Cook macaroni for 3 minute less than the box directions.  Drain.
  3. Heat a large skillet over high heat.  Add ground beef and onions to the pan.  Break beef apart, cooking for 6-7 minutes until browned.  Drain any fat.
  4. Mix in garlic and cook for 1 minute until fragrant.
  5. Add in worchestershire sauce, tomato sauce and diced tomatoes. Mix until combined.
  6. Stir in Italian seasoning, salt and pepper. Taste and adjust seasonings to taste.
  7. Mix in cooked macaroni and cheddar cheese. If skillet is heat safe, you can place in the oven for 20-25 minutes until bubbly and cheese is melted.  Or transfer to casserole dish and bake.

Focaccia Bread recipe

(reposting cause I can never find the recipe among all the ads anymore. link below.)

The Best, Easiest Focaccia Bread Recipe | Alexandra’s Kitchen

The Best, Easiest Focaccia Bread Recipe

Cold, refrigerated dough is the secret to making delicious focaccia! Allowing the dough to rest 18 to 24 hours in the fridge will yield extra-pillowy and airy focaccia, though if you are pressed for time, you can make this start-to-finish in 3 hours. This 4-ingredient recipe requires only 5 minutes of hands-on time. Video guidance below!

Adapted from the focaccia recipe in Bread Toast Crumbs.

A few notes:

  • Plan ahead: While you certainly could make this more quickly, it turns out especially well if you mix the dough the day before you plan on baking it. The second rise, too, takes 2 to 4 hours.
  • If you are short on time and need to make the focaccia tonight: Let the mixed dough rise at room temperature until doubled, about 1.5 to 2 hours. Then proceed with the recipe, knowing the second rise will only take about 30 minutes.
  • You can use various pans to make this focaccia such as: two 9-inch Pyrex pie plates. (Use butter + oil to prevent sticking.)  One 9×13-inch pan, such as this USA pan — do not split the dough in half, if you use this option, which will create a thicker focaccia . A 13×18-inch rimmed sheet pan — this creates a thinner focaccia, which is great for slab sandwiches.
  • As always, for best results, use a digital scale to measure the flour and water.
  • I love SAF instant yeast. I buy it in bulk, transfer it to a quart storage container, and store it in my fridge for months. You can store it in the freezer also.
  • If you are using active-dry yeast, simply sprinkle the yeast over the lukewarm water and let it stand for 15 minutes or until it gets foamy; then proceed with the recipe.
  • Flour: You can use all-purpose or bread flour here with great results. If you live in a humid environment, I would suggest using bread flour. If you are in Canada or the UK, also consider using bread flour or consider holding back some of the water. Reference the video for how the texture of the bread should look; then add water back as needed.

INGREDIENTS

  • 4 cups (512 g) all-purpose flour or bread flour, see notes above
  • 2 teaspoons (10 g) kosher salt
  • 2 teaspoons (8 g) instant yeast, see notes above if using active dry
  • 2 cups (455 g) lukewarm water, made by combining 1/2 cup boiling water with 1 1/2 cups cold water
  • butter for greasing
  • 4 tablespoons olive oil, divided
  • flaky sea salt, such as Maldon
  • 1 to 2 teaspoons whole rosemary leaves, optional

INSTRUCTIONS

  • Make the dough: In a large bowl, whisk together the flour, salt, and instant yeast. Add the water. Using a rubber spatula, mix until the liquid is absorbed and the ingredients form a sticky dough ball. Rub the surface of the dough lightly with olive oil. Cover the bowl with a damp tea towel, cloth bowl cover, or plastic wrap and place in the refrigerator immediately for at least 12 hours or for as long as three days. (See notes above if you need to skip the overnight rise for time purposes.) NOTE: It is important the dough really be slicked with olive oil especially if you are using a cloth bowl cover or tea towel as opposed to plastic wrap or a hard lid. If you are using a tea towel, consider securing it with a rubber band to make a more airtight cover. If you do not slick the dough with enough oil, you risk the dough drying out and forming a crust over the top layer. 
  • Line two 8- or 9-inch pie plates or a 9×13-inch pan (see notes above) with parchment paper or grease with butter or coat with nonstick cooking spray. (Note: This greasing step may seem excessive, but with some pans, it is imperative to do so to prevent sticking. With my USA pans, I can get away with olive oil alone; with my glass baking dishes, butter is a must.)
  • Pour a tablespoon of oil into the center of each pan or 2 tablespoons of oil if using the 9×13-inch pan. Using two forks, deflate the dough by releasing it from the sides of the bowl and pulling it toward the center. Rotate the bowl in quarter turns as you deflate, turning the mass into a rough ball. Use the forks to split the dough into two equal pieces (or do not split if using the 9×13-inch pan). Place one piece into one of the prepared pans. Roll the dough ball in the oil to coat it all over, forming a rough ball. Repeat with the remaining piece. Let the dough balls rest for 3 to 4 hours depending on the temperature of your kitchen.
  • Set a rack in the middle of the oven and preheat it to 425°F. If using the rosemary, sprinkle it over the dough. Pour a tablespoon of oil over each round of dough (or two tablespoons if using a 9×13-inch pan).  Rub your hands lightly in the oil to coat, then, using all of your fingers, press straight down to create deep dimples. If necessary, gently stretch the dough as you dimple to allow the dough to fill the pan. Sprinkle with flaky sea salt all over.
  • Transfer the pans or pan to the oven and bake for 25 to 30 minutes, until the underside is golden and crisp. Remove the pans or pan from the oven and transfer the focaccia to a cooling rack. Let it cool for 10 minutes before cutting and serving; let it cool completely if you are halving it with the intention of making a sandwich.

Delicious Sausage Linguine – Jamie Oliver

Delicious sausage linguine

Ingredients 
150 g dried linguine 
200 g broccoletti , or sprouting broccoli 
olive oil 
1 large higher-welfare sausage , (125g) (Redhawk – This could be Chicken)
1 clove of garlic 
2 anchovy fillets in oil , from sustainable sources 
1 pinch of dried red chilli flakes 100 ml Frascati white wine
20 g pecorino , or Parmesan cheese extra virgin olive oil 

Method 

Cook the pasta in a pan of boiling salted water according to the packet instructions, then drain, reserving a mugful of starchy cooking water. 

Meanwhile, trim the broccoletti (halving any thick stalks lengthways to make them more delicate to eat). Place a large frying pan on a medium heat with 1 tablespoon of olive oil. Squeeze the sausagemeat out of the skin into the pan, breaking it up with a wooden spoon. Once lightly golden, peel, roughly chop and add the garlic, followed by the anchovies, chilli flakes, broccoletti and wine. Leave to bubble away while the pasta cooks. 

Toss the drained pasta into the sausage pan, then finely grate over the pecorino and drizzle with extra virgin olive oil. Toss again, loosening with a little reserved cooking water, if needed, to create a light, creamy sauce. Taste and season to perfection, then serve right away. 

Green Chili Stew

This is a recipe basically from the guy at the Farmers Market selling vegetables.  I added all the subtleties.

  • Ingredients
    • Pork Country Ribs or Chicken, breasts or whole bird suggest 2 pounds near about.
      • Country rib cut has some fat, and loin and does great to grill it out.
    • Green Chili ( how spicy is your choice, Hot Hatch, Big Jim’s, Anaheim’s, or a combination to get to the heat level you like.  I do a split of Big Jim’s and Anaheim’s or Poblano’s )
    • Garlic
    • Chicken stock
    • Dark Beer ( optional )
    • Fresh Sweet Corn about 2 ears
    • Potatoes ( optional, 2 medium sized )
    • Onion
    • Zucchini
    • Oregano, Salt, and Pepper


  • Grill the country ribs or roast the chicken season as you would a pork chop or beer can the chicken, grill chicken breasts, what works for you.
  • While that is going take an onion, Garlic, and saute in a dutch oven preferably over a grill, adding oregano, lite amount of salt and pepper to taste.
  • Take the roasted green chili you just bought at the farmers market and clean, chop in sizes that work for you, chunks, or fine.
  • Add the green chili to the onion and garlic, saute for a bit then add chicken stock and beer or just stock as you like.  Let how it tastes be your guide.
  • While that simmers, take your meat and either chunk or shred as you like and add to the Dutch oven, make sure you have enough liquid to cover.
  • Check your salt level, taste.
  • Boil your corn.  Let cool enough to cut the kernels from the cob. Set aside to add near the end.
  • Cut your potatoes if you want, and add to dutch oven, I suggest cutting these in very small half inch squares.  I would go fewer than you think, they will compete with the zucchini and corn. But it is a good way to stretch the quantity.
  • Add potatoes to the Dutch oven, make sure you have enough liquid to cover
  • Cut your Zucchini in to chunks, about 3/4 of an inch, set aside to add later.
  • Make sure you have enough liquid to over adding your potatoes, Zucchini and corn. ( keep reminding you don’t I )
  • When the potatoes are ready, add the corn and Zucchini, they will only need a little more cooking, I like my Zucchini with some crunch.
  • If you like, add some corn starch slurry to thicken, but you may not need it.

This is a guide and this is an art, go with the flow and the taste of the particular ingredients you have.

Drink a Corona, or Modelo or some similar beer while enjoying the stew.

Mom’s Toffee Recipe

Mom made this toffee every year at Christmas time, do not know where she got the original, but these are pictures of her card.

Ingredients:

1 cup Butter or Margarine - (really? use butter... )
1 1/2 Cup Sugar
2 cups finely chopped Almonds (toasted at 350degree oven.)
2 TBS light corn syrup
2 TBS Water
1 Package 12 oz semisweet Chocolate Chips
1 Cup Almonds.

Instructions:

Melt Butter, add Sugar, corn syrup, water, cook stir to 300 degrees.
Remove from heat and stir in nuts.
Pour into 10 x 15 pan, 1/2 inch side, Greased.
Cool completely.
Loosen and spread 1/2 melted chocolate chips over cold candy.
Sprinkle 1/2 cup nuts, let set and cool.
Then turn over and repeat Chocolate & nutes cool and break up.
Ok, now my edits.
Heat the sugar/toffee mixture to 290 degrees, not 300, it will continue to rise a bit and it can get burned really fast if you wait till 300.  So don't panic at 290, just get it before 300. 

- UPDATE
( At altitude, like 5000ft, 290 works, but at sea level you may want to keep it to 300-305.  The boiling point of water is about 203 at 5000ft, not 212. )

- UPDATE - Thanks C
Further exploration, in a humid environment you may want to increase the Corn Syrup to 3TBS. In England, where you can't find Corn Syrup, use Golden Syrup and definitely increase to 3TBS.  The increase is to prevent it from crystalizing and keep it clear.  If it starts to show pasty, pale, or foamy sprinkle some water on it.

Put in (1)6 ounce package of sliced almonds that you toasted and chopped into the toffee as described above.

I don't use as many almonds as described, I actually use (2)6 oz packages of sliced almonds, 1 package mixed in and the other used to sprinkle on the chocolate.

I put the almonds on a cookie sheet cold oven, start it heating to 350, by the time it is at 350 and the oven beeps, you are ready to stir the almonds, and toast another 5 minutes.  Remove and chop, and do this BEFORE you start the sugar/butter toffee.  

Stir that sugar/butter mix all the time once you start till you get to 290.  Don't do anything else here.

Put parchment paper down on your 10 x 15 pan to pour the toffee mix onto, much better to do the flipping later.

Read all the instructions.  ( bet you didn't )


THE Yeast Roll Recipe

From the Old Betty Crocker Cookbook.
A couple of changes to the recipe, which you can see mom penciled in.

1. 1 & 1/2 Cups Milk.
2. 1/2 Cup Warm ( 100 degree ) water with 1/4 teaspoon of sugar and 2 packets of yeast to start the yeast.
3. Heat the milk to lukewarm on the stove top with the Sugar and Salt added.

I use a mixer with a dough hook.  Add the Milk/sugar/salt mixture, eggs.  Add a cup of flour, then add the yeast and shortning.

Continue to mix and add flour a cup at a time till the mixture starts coming together.

I was never able to get 7 cups of flour into the the dough, but 5-6 cups.  From the picture below you can see what 5.5 - 6 Cups gives you about 5 dozen rolls.

Once you have it together and you can't use the mixer any more because the dough is climbing up the hook, take the dough out put on a flat surface and nead a while, make sure that you get a nice smooth dry touch to the dough.

Place in a greased bowl to rise, double size, ( 45 minutes ), punch down and let rise again.  Make sure you are in a warm room ( 80 degrees ) or have it in a warm place to rise, on top of a warm oven can work.

After the second rise, roll it out about 1/2 inch and cut rounds that are about 2.5 inches around.  Fold over in half, and arrange in 8 inch pie tins, 10 around, 2 in the middle.  

Melt some butter, ( I use a full stick ) and brush the tops of the rolls.  Let rise to double.  DON'T CHEAT.  They have to rise above the pan and fill the gaps or they will not be fluffy and light, but dense and pucky.

When they are ready, 15 minutes ( or golden brown ) in a 350 degree oven.  I bake on two shelves and rotate around and between shelves at the 7.5 minute mark.

When done, brush with butter again, take out of the pans onto cooling racks.  Sneak a roll or two from the dregs pan.  ( the one where you took the leftover dough and made it back into a ball and rolled out. )  You have to sample them, its for the good of the planet.

After cool, I wrap in aluminum foil and freeze.  I do these a few days ahead because it is so intensive a process.  If you freeze them they will stay fluffy and nice.  Take out of the freezer when ready let set 15-30 minutes, then put into a 350 degree oven for 15-20 minutes to get really nice and hot.  Then serve.

Mom’s BBQ recipe

This is amazingly good and many will dismiss.  My alterations is that I smoke the beef and pork in a Green Egg.

You may notice on the recipe cards, there is reference to Mango, this must be some odd mixed up reference from southern Indiana and Green Bell Peppers.  There is no Mango in this recipe or any that Mom made, you could not get them in Indiana back then.. Lol.


Cook together 2 lbs of Pork and 2 lbs of Beef.  I assume that this is braised in water, I slow cooked on a smoker, but a grill will work as well at a very low temperature.

Saute 1 cup of chopped Onion, 1 cup of Green Pepper, and Celery.  I do this in Butter.  Add this to the sauce.

Take the meat when done and and falling apart, into larger pot, if not done cook in some water.  

Start the sauce, which is;
1 can of Campbells Tomato soup.  ( yes really )
1/2 cup Ketchup
2/3 cup sweet pickle relish
Dash of Paprika
2 T of Worcestershire Sauce
2 T of Vinegar ( apple )
1 t of Chili Powder
1 t of red chili flakes if you like.
1/4 cup of sugar, ( not sure this is really necessary, adds too much sweetness. )
Then add the Green Pepper, Onion, and Celery.

I took the meat, retaining the broth from any braising efforts and maybe beef broth if you like, and I chopped up the meat so it was more chunked than like pulled pork.

Use that broth to get the right level of moisture and consistency, in some ways it is more like a sloppy joe, but man it is tangy and good.

Goes great on a bun.

Images below are of a second recipe card mom had.

Mom’s Swiss Steak

From Mom’s recipe card.

  • 1″ thick Round Steak
  • 1 – 8oz can Tomato Sauce
  • 1 Cup Water
  • 1 tsp Beef Stock Granules/Bullion
  • Chopped Onion – not too small a cut.

Remove Fat and cut steak into pieces.  Pound and flour pieces.  ( I usually put a little salt and pepper in the flour mix. )

Sauté until browned.  Place in pyrex pan.

Saute onion in skillet add tomato sauce and water, add beef stock.  Make sure you have enough liquid, this is the gravy for the mashed potatoes.  Simmer till hot and you have all the good bits deglazed from the pan.

Pour over the meat, Cover with aluminum foil, and bake at 325 for 2.5 hours.

Serve with Mashed potatoes and peas of course.